
Open Concept Kitchen Transitions: How to Blend Hardwood Living Rooms With Luxury Vinyl Tile
Hardwood in the living room and luxury vinyl tile in the kitchen can share one open floor plan without looking like two separate jobs. The pairing works when three things are right:
- The line between the two floors follows something the room already has, usually the back of the kitchen island.
- Both surfaces finish at the same height.
- The vinyl tile picks up the undertone of the wood instead of trying to imitate it.
At Select Floors we have installed this combination on open main levels across Cobb County and North Metro Atlanta, and those three decisions come up in the same order on every job we quote.
Here’s the short version of how to pair the two floors, for anyone planning a kitchen right now:
- Put the seam at the back of the island or under a ceiling line, never in the middle of open floor.
- Build the vinyl side up so both floors finish flush. Left alone, 3/4-inch hardwood beside 1/4-inch vinyl leaves a half-inch lip.
- Choose a stone-look vinyl tile, not a wood-look plank, and match the undertone of the hardwood.
- Glue the kitchen tile down for the cleanest edge. A floating floor needs a wider cover strip.
- Set the island before a floating floor is laid, never on top of it.
The kitchen below is from one of our installations, and you can see more of our projects on our Instagram page. The owners of this home ran one wide oak plank through both zones, so the island is the only break in the floor. The photo shows the spot where the eye already expects the kitchen to begin, and that is the line we are talking about, whether it ends up in wood or in tile.
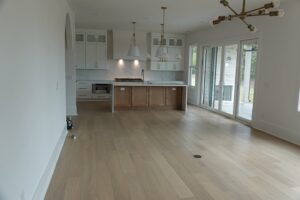
One run of wide oak planks ties the kitchen to the living area, with the island as the only break in the floor.
Why put luxury vinyl tile in the kitchen and keep hardwood in the living room?
Each floor goes where it does its best work. The kitchen gets water, grease and dropped pans, and luxury vinyl tile shrugs those off. The living room gets feet, furniture and sunlight, and real wood handles those while giving the room the warmth people want to live with.
Luxury vinyl tile, usually shortened to LVT, is a vinyl floor made in tile shapes. A printed stone or ceramic look sits on top, a clear wear layer protects the print, and in the products we recommend for kitchens a rigid core sits underneath. That core is a dense, stiff layer of mineral and plastic composite that keeps each tile flat and firm underfoot, which is why the industry calls these floors rigid core. The luxury vinyl we carry, including the COREtec tile collections, is built this way.
Water is the reason the kitchen gets the vinyl. A leaking dishwasher hose or an overflowing sink stains and swells a wood floor if the water sits for long. A rigid core tile is waterproof through its full thickness, so the same spill wipes up the next morning. The tile also feels warmer underfoot than ceramic in winter, and in our experience a dropped pan that would chip porcelain leaves no mark on it. That is why we steer most open-concept kitchens toward a stone-look luxury vinyl tile rather than real porcelain.
Hardwood stays in the living room for the reasons it has always been there. Wide oak planks give the room its warmth, and they can be sanded and renewed through hardwood refinishing when the finish wears. The homeowners we work with still ask for real wood in the main living space. Splitting the two materials also lands the budget between an all-hardwood main level and an all-vinyl one.
The living room below, from another installation of ours, shows the hardwood side doing its job. Wide planks run under the seating toward the fireplace, and nothing in this room asks the floor to be waterproof.
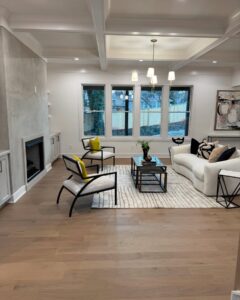
The living side of an open plan keeps the warmth of real wood underfoot.
Once the two materials are settled, the harder question is where one stops and the other starts.
Where should the hardwood stop and the vinyl start?
Put the line where the room already draws one. In most open plans that is the back of the kitchen island. The work aisle between the island and the range gets vinyl tile, and everything from the island stools outward stays hardwood. The island face becomes the border, and the kitchen reads as its own room without needing a wall.
If the island does not give you a line, look up. A soffit, which is a boxed-in strip of ceiling that hangs lower than the rest to hide ductwork or to frame the cabinets, marks the kitchen from above. A beam or the edge of a coffered ceiling does the same. A floor seam that lands directly under one of those looks planned, because the ceiling has already told the eye that the room changes there.
The great room below is from another of our projects, and it has the kind of ceiling we mean. Beams cross the room at even spacing, and a floor change under any one of them would read as part of the design.
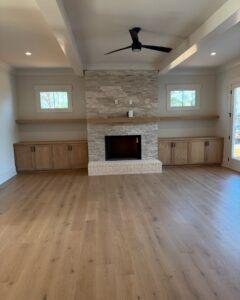
Ceiling beams like these give a floor seam a reason to land where it does.
When nothing overhead marks the kitchen, keep the line simple. Run it straight and parallel to the cabinets, and end it at a wall corner or a doorway rather than somewhere out in open floor. Angled and curved borders are hard to cut cleanly in a rigid product, and they tend to date a kitchen quickly.
Before anyone cuts a board, stand at the front door and look toward the kitchen. The seam should fall where you already expect the kitchen to begin. Our crews walk that line with you on installation day, before the first plank is fastened, as part of our hardwood installation process.
A line in the right place still fails if one floor stands taller than the other, which is the next thing to solve.
How do you make two floors of different thickness meet flush?
Build the thinner floor up until both surfaces finish at the same height. Hardwood and vinyl tile are made to different thicknesses, so without a plan the vinyl side ends up lower. The table below shows the usual thickness of each floor, with the source for each figure.
| Floor | Usual thickness |
|---|---|
| Solid hardwood | 3/4 inch |
| Engineered hardwood | 1/2 to 5/8 inch in most homes (made from 3/8 to 3/4 inch) |
| Rigid core luxury vinyl tile | 5 to 8 mm, about 3/16 to 5/16 inch, plus any attached pad |
Put 3/4-inch hardwood next to a 6 mm vinyl tile, which is a little under 1/4 inch, and the vinyl side sits about half an inch lower (3/4 minus 1/4). That lip lands exactly where people walk between the island and the sink. Half an inch is enough to catch a toe or rock a bar stool.
We close that gap one of three ways:
- Raise the vinyl side. A layer of 1/4- or 3/8-inch plywood screwed over the subfloor lifts the tile to meet the wood and gives the adhesive a flat, dry surface. The subfloor is the structural floor under the finished flooring. This build-up is our usual fix in a kitchen.
- Lower the hardwood side. A 1/2-inch engineered plank in place of 3/4-inch solid wood shrinks the difference to about 1/4 inch, which a low-profile transition strip can handle. Engineered boards also suit a main level built over a concrete slab, as our guide to solid versus engineered planks explains.
- Use a reducer. A sloped transition strip takes up the height difference where the budget rules out subfloor work. It is the least costly fix and the one you will feel underfoot.
Whichever route you take, both floors need a flat base. Rigid core tile is stiff, so a hump in the subfloor shows through it, and a hardwood plank nailed over a dip squeaks at the seam for years. The National Wood Flooring Association guidelines set the flatness standard for a nailed wood floor at 1/4 inch over 10 feet. COREtec’s installation instructions ask for 3/16 inch over 10 feet under its vinyl. Our crews check both sides with a 10-foot straightedge during the in-home measure, then grind the high spots and fill the low ones with a leveling compound before either floor goes down.
With the heights matched, the strip that covers the seam is the last visible decision.
Which transition strip covers the seam?
A transition strip is the narrow piece of wood, vinyl or metal that covers the joint where two floors meet. Three types handle almost every hardwood-to-vinyl seam, and the height difference between the two floors picks the one you need. The table below compares them.
| Strip | What it is | Use it when | What it looks like |
|---|---|---|---|
| T-molding | A strip shaped like a T in cross section. The stem drops into the gap between the floors and the top covers it. | Both floors finish within about 1/8 inch of each other and the vinyl floats, so the gap under it needs covering. | A low bar about 2 inches wide, in wood to match the planks or in vinyl to match the tile. |
| Reducer | A strip with a slope on one side that steps down from the taller floor to the lower one. | The vinyl sits 1/8 to 3/8 inch lower than the hardwood and nobody wants to build the subfloor up. | A small ramp. Wood versions blend with the planks. |
| Flush metal profile | A thin aluminum, brass or stainless edge set level with both floors | Both floors are flush and the vinyl is glued down, so there is no wide gap to cover. | A pencil-thin line of metal. The cleanest look of the three. |
Material matters as much as shape. A wood T-molding or reducer milled from the same species as your planks and stained to match disappears into the hardwood side. The vinyl-wrapped strips sold alongside the tile cost less, but they often read as plastic next to real oak. Metal suits a kitchen with black window frames or a dark island, and stained wood suits a traditional home. Whichever you choose, one continuous length with no joints, fastened to the subfloor rather than to the floating floor, gives the seam a single clean line.
The entry below is from a project we shared on Instagram this August, and it takes the opposite approach. Instead of hiding the seam, the hardwood meets a patterned stone floor along one straight line, and the change in material is the design. The same idea works at a kitchen edge with a stone-look vinyl tile and a flush metal profile.
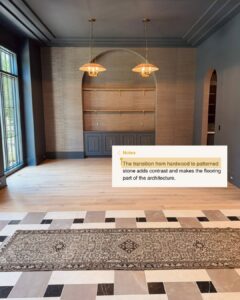
Two materials, one straight line. Here the contrast is the point.
A clean seam only looks right when the two surfaces look right together, which brings us to color.
How do you choose a stone-look vinyl tile that looks right beside the wood?
Choose a tile that contrasts with the wood instead of imitating it, then match its undertone. Undertone is the faint color underneath the main color. A warm undertone leans yellow or red, and a cool one leans blue or gray.
Contrast comes first. Wood-look vinyl plank laid against real hardwood invites a comparison the vinyl rarely wins, because the printed grain repeats and the color sits a shade off. A stone-look or concrete-look tile makes a clean break. The eye reads two materials doing two jobs and stops checking whether they match.
The two floors still need to agree on temperature. The warm natural oak and greige planks we install most often (greige is a blend of gray and beige) pair with tiles that carry a warm gray, taupe or soft cream base. A cool blue-gray slate look beside honey oak fights the planks from across the room, and a bright white marble look beside dark walnut flattens the wood. We pick the tile’s veining color from the darker grain lines in the plank or from the countertop, the same way we match hardwood stains to existing wood cabinets.
The kitchen below, from another installation of ours, shows how far contrast can go when the undertones agree. A black island and black pendants sit on pale oak planks, and a warm gray stone-look tile in the work aisle would belong to the same palette.
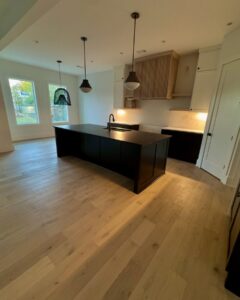
Dark cabinetry against pale oak shows how far contrast can go when the undertones stay warm.
Size and layout finish the job. Large tiles, 12 by 24 inches or bigger, keep the kitchen calm beside wide planks. Setting the long edge of each tile parallel to the plank direction carries the room’s lines across the seam. A grout-look edge gives a true tile read, and a tight edge with no grout line suits a modern kitchen with flat cabinet fronts. A matte finish on both floors keeps the sheen consistent, so light from the windows does not bounce off one side and die on the other.
Once the materials and the line are chosen, the result depends on how the two floors are installed against each other.
What should your installer do differently at the seam?
The seam is where most two-floor installations go wrong, and five habits prevent it. Our crews follow these five steps, in this order, on every open-concept main level.
- Check the subfloor on both sides first. Old kitchen floors often hide soft spots and water damage near the dishwasher and sink, and we find out the day the old floor comes up. We repair those spots before anything new goes down, and our guide to the telltale signs of subfloor damage shows what we look for. We also meter the moisture in the slab or plywood. The National Wood Flooring Association calls for a moisture test on every wood floor, and the adhesive under a glued vinyl tile needs a dry base even though the tile itself is waterproof.
- Install the hardwood first. The wood is nailed or glued down with its expansion gap at the walls. That gap is the small space left so the boards can swell in humid weather without buckling. The vinyl side is then built up to meet the wood, and working in that order lets us scribe the tile to it. Scribing means tracing the exact line of the finished hardwood onto each tile and cutting to that line. The joint then stays tight even where the wall or the island is not perfectly square.
- Glue the kitchen tile down. Rigid core tile can be installed two ways. A floating floor clicks together into one large sheet that rests on the subfloor without being fastened. It needs a gap of about 1/4 inch wherever it meets a fixed edge, including the hardwood, which is the spacing COREtec’s installation instructions call for. A glue-down floor is bonded to the subfloor, so it can run up to a flush metal edge or a straight hardwood border with almost no gap. For the cleanest seam, we glue.
- Set the island before a floating floor is laid, never on top of it. The National Wood Flooring Association guidelines say a floating floor should never be installed where fixed cabinetry such as a kitchen island will lock it down. A pinned floor cannot move with the seasons, so it pushes up somewhere else, the same way vinyl planks push against baseboards when they have no room. A glued floor has no such problem, which is one more reason we glue the kitchen.
- Fasten the transition strip to the subfloor, not to the floor. The strip stays put while a floating floor moves underneath it, and a single length with no splices keeps the line clean.
All of that assumes two floors are the right answer, and sometimes they are not.
When is one floor throughout the better call?
Two materials suit an open plan with a clearly defined kitchen: a long island, a full run of cabinets and a generous living zone on the other side of the line. A smaller open plan, where the kitchen is a single wall of cabinets and the sofa sits a few steps from the range, usually looks larger with one surface.
In those rooms a waterproof rigid core plank from our luxury vinyl catalog in a convincing oak look carries the whole level with no seam at all. Hardwood throughout is the other single-surface answer when the kitchen gets light use, with a washable runner at the sink and felt pads under the stools to protect the finish.
A quick test settles it. Stand at the front door and count the flooring changes you can see. One is a design choice. Two or more start to read as a patchwork.
Quick answers about pairing luxury vinyl tile with hardwood
Can you install luxury vinyl tile right next to hardwood?
Yes. The two floors meet at a straight seam covered by a transition strip or a flush metal edge. The vinyl side is usually built up on plywood so both surfaces finish at the same height, and a glued-down tile gives the tightest joint.
Do you need a transition strip between vinyl tile and hardwood?
Almost always. A floating vinyl floor needs a gap at the hardwood so it can move, and a T-molding covers that gap. A glued tile that finishes flush with the wood can meet it at a thin metal profile instead, which is the cleanest option.
Should the kitchen floor match the living room floor in an open concept?
The colors should agree, but the materials do not have to. A stone-look tile in a warm gray or cream beside warm oak planks looks planned. A wood-look vinyl beside real wood invites a comparison it rarely wins.
Is luxury vinyl tile thinner than hardwood?
Yes. Most rigid core tile is 5 to 8 millimeters thick, roughly 3/16 to 5/16 inch, while solid hardwood is 3/4 inch. The vinyl side needs a plywood build-up, a thinner engineered hardwood or a reducer strip to avoid a half-inch lip.
Where does the vinyl tile stop in an open kitchen? At the back of the island in most layouts, so the work aisle is tile and the stool side is wood. Without an island, use a ceiling beam or soffit as the line, or run it straight to a wall corner or a doorway.
Plan your open-concept floors with Select Floors
Our showroom at 1890 West Oak Parkway in Marietta has full-size hardwood planks and stone-look luxury vinyl tiles you can set side by side under the same light, which answers the undertone question faster than any photo. Bring your kitchen layout and we will mark the seam with you. When you are ready, request your free in-home estimate and our estimator will measure both zones, check the subfloor and price the hardwood, the vinyl tile and the transition as one job. Flooring financing is available for a whole-main-level project.
In-Home Estimate
Fill out the form below and a member of our team will be in touch shortly.
"*" indicates required fields
Related reads
- Why Fall HVAC Shifts Make Luxury Vinyl Planks Push Against Baseboards
- Telltale Signs of Subfloor Damage Beneath Old Flooring and How Installers Repair It
- Hardwood Floor Stains to Complement Existing Wood Cabinets
- Hardwood Floors for Historic Milton Farmhouses: Solid vs Engineered Planks
- Ground Moisture Protection: Why Rigid Core Vinyl Prevents Buckling in Lakeside Basements